Monday, July 20, 2020

Progress on my Venetian Ensemble!


Failing a bit at "serious Renaissance portrait face," but you can
see the new accessories pretty well in this shot.  Don't mind the
modern second ear piercings I forgot to take out for pictures!

My local Renaissance Festival may have announced the cancellation of their 2020 season last week, but that doesn't mean I'm not still working on garb!  In between medieval pieces for a friend, I've done some work on my Venetian ensemble as well.  I made some coral earrings to go with my coral necklace last month, and hemmed some silk organza to make a veil.  I also bought some veil pins and another ring that works for the 16th century online.  It's not much, but I think it really helps pull my outfit together!
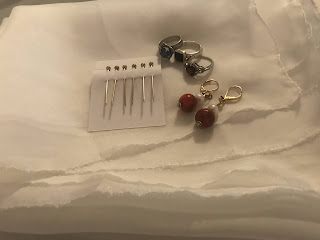


All the new things, plus the 2 rings I already had that can
pass for Italian Renaissance.  I'm really pleased with my
new earrings!


There's still some work to be done on this outfit.  I still think the skirt could use a little more volume to look like what you see in 1550's and 60's art, and I'm currently working on a corded petticoat that will (hopefully!) help with that.  I also plan to make a fancy underskirt, though I haven't even found fabric for that yet.  
Better serious Renaissance face here!
Unfortunately, Colorado looks
nothing like Venice.

I also need to add hooks and eyes to the slit in the skirt to hold it closed.  I thought it looked fine before, but I've been looking at more portraits, and the skirt is almost always closed just under the edge of the bodice.  I safety pinned it for these pictures, which makes it hang a little strangely.

I really need to fix my sleeves, too.  They're a little too tight at the top edge, which makes getting dressed difficult and also causes my sleeves to work their way down my arms, pulling the straps of the bodice with them.  Venetians were fond of the edge-of-the-shoulder look, but these are pulling too far and making it a little difficult to use my arms.  Plus it's creating a weird situation with my camica and partlet that needs constant adjusting.
The weird sleeve-strap-partlet-camica situation
is easier to see here.  I think I didn't leave enough
ease when making the sleeves, and then went back
to work after the quarantine and my arms got a little
more muscular, so the problem with fit became
much more obvious.

I plan to fix this by removing the stitches holding the panes together and adding a slightly bigger strip of fabric around the top edge of the sleeve in their place, adding maybe an inch to the sleeve circumference.  Will update with results.  I also plan to make a second pair of sleeves out of a remnant of silk brocade, which I'll do in the new way if that works better.  I also think that part of the problem is with my camica being a little too wide in the neck, though I haven't decided yet if I'm going to re-work it or just make a second one.  That depends on the results with the sleeves.  All in all, though, things are coming together nicely.  Now I just need somewhere to wear this...  Perhaps the grocery store?  Or my day job?


Another veil pic.  Because I think my veil is awesome.
So flowy and cute!  I need to get better at pinning it,
though.  


Monday, July 13, 2020

14th Century Belt Purse


This piece is part of a medieval ensemble for a friend I've been working on on and off for the last several months, designed around her wanting to wear a dress but also carry a sword for RenFaire.  As such, we were more concerned with putting together something fun than being particularly historically accurate.  As such, the various pieces of the outfit don't all come from the same time period, but it's going to look cool for Faire, which is all that really matters in this case.  The purse itself is pretty accurate, though, so I thought I'd share it here!

This purse is based on the drawstring belt purses seen in a lot of late medieval manuscripts, which come in a variety of shapes.  These purses are mainly from the 14th and 15th centuries, putting them about 400-500 years after the dress and hood this is going to be paired with, but it's for fun, not reenactment, so I decided to go with it.  Besides, they're cute, but wouldn't go with my 16th century wardrobe, so when else am I going to make one?
71 Best Kirtles images | Medieval clothing, Medieval costume ...  83 Best Garb - GFD Necklines images in 2020 | Medieval art, 14th ...  Image result for "15th century" gown with demicient belt ...

Most of the manuscript purses appear to be rectangular, though some are a little pointier.  For no particular reason, I decided to make my purse pointed at the bottom, though it turned out a little more round than pointy.  I can't quite tell of the purse on the left has tassels on the drawstrings or not, but the one on the right clearly has either small tassels or pom poms all over it, so I decided that a little decoration was acceptable.  I also chose to coordinate the purse with the rest of the outfit for no particular reason other than that I didn't want to have to find fabric for it and I had leftovers from the dress and hood.  I also chose not to buy cording or decoration, again mostly to avoid overspending, and tried making my own braided cord.

The grey wool hood fabric and the red
linen dress fabric look cute together,
so why not use them, right?
Once I figured out what I was doing, this purse came together really quickly.  I cut out front and back pieces in both the red linen lining and the grey wool fashion fabric.  I sewed the lining pieces together "right" sides together, and then repeated the step with the wool, this time leaving a gap at the center bottom for the middle tassel.  Then I made the tassel by simply folding 6 strands of yarn in half and knotting them, then trimming the ends to the same length.  I inserted this in the gap in the wool body of the purse, leaving the end I wanted to show between the right sides of the fabric.  I then flipped the whole thing inside out and pressed the seams.

Next, I made the braids.  For the strap, I used 12 strands of a medium thickness acrylic/wool blend yarn, tied a knot in one end, divided into 3 sections, and braided tightly.  When that was done, I knotted the other end and cut down the ends to make tassels.  I then repeated the process with only 9 strands of yarn to make the drawstring.

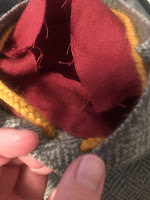
Making the drawstring channel. 
Lots of pins to hold the fabric in place.
Inserting the drawstring
Closing the channel and
finishing the edges.


The last step!  Whip stitching
the strap to the bag.
Then back to sewing.  I inserted the lining into the outer shell of the bag and made sure the seams lined up properly.  Then I backstitched a seam near the top to create a channel for the drawstring.  I made 2 eyelets in the center front of the drawstring channel, inserted the drawstring, and then finished the raw edge of the lining as well as the top of the channel by folding the raw edge in and whip stitching the lining to the shell.  I didn't have any raw edges to finish on the shell because I had used the selvedge as the top edge while cutting.  Finally, I pinned the strap to the sides of the bag and whip stitched them in place.  Done!

This was probably the easiest project I've done in a while, and certainly the quickest.  And I (kind of) learned a new skill, so yay!  I was really pleased with how the braids came out, as I was sceptical of using yarn for trim, but they're cute!  I'm now considering making braided trim for an upcoming project rather than spending on the velvet ribbon I was going to buy... We'll see!