Showing posts with label Venetian. Show all posts

Tuesday, January 5, 2021

How I Make A Camica (Shift)


The shift (camica in Italian) is the basic undergarment for women of all classes and all styles of dress across western Europe from the early middle ages through the eighteenth century. While it goes by different names at different times and in different places, and the style does vary a bit, especially in later centuries, this is a good basic square necked shift pattern that will work for just about any Italian Renaissance outfit. While upper class camice were frequently embellished, and you can certainly do so to yours, a simple one will never look out of place with any Italian ensemble. While the Italian style isn't exactly the same as what is seen in Northern Europe in the 16th century, you could certainly get away with using this with English or German garb in a pinch. Just keep in mind that the Italian style of shift is much more voluminous, so if you need this to work with clothes from other regions, consider reducing the volume of fabric used, particularly in the body.

The pattern is extremely simple; it's just rectangles.  The linen I use is 58 inches wide, which is a lot wider than 16th century fabrics.  Since that's close to double a period loom width, I use one full fabric width total for the front and back (so a half width for the front and the other half width for the back).  Since I'm very petite, I could probably get away with a bit less if I was really trying to conserve fabric, but just using the full width makes cutting very simple, so that's what I do.  So the front and back pieces are one full fabric width by the desired length, which for me is just a little below the knee, though a lot of people prefer theirs longer.  The side panels are the same length by one quarter fabric width, and the sleeves are a quarter width by 6-12 inches longer than your arm, depending on how voluminous you want them to be.  One quarter width makes for a narrower sleeve; if you want yours more voluminous, use more fabric!  The underarm gussets are approximately 10x10 inch squares, which I cut out of the fabric left over from the difference between the sleeve and side panel lengths.  Cuffs and neck band are optional, depending on your style.

I like to use sheer linen,
but there are plenty of 
other fabric choices 
that work just as well.
I use about 2.5 yards of 58 inch wide fabric to make a camica, but if you're tall or want a really long one, you will probably need more.  I prefer a very light weight linen, because it can have a lot of volume without adding a lot of bulk.  Linen is the most correct period material, though cotton and linen/cotton blends were available in Italy and Spain in the 15th and 16th centuries.  Some reenactors use sheer silks, but there's little evidence for this in period.  The whole point of the camcia is to protect the not-very-washable silk and wool outer clothes from sweat and body oils, so it only makes sense to use an easily washable fabric.  While both cotton and linen are easy to wash, I prefer linen because I think it breathes better, and it also wicks moisture away from the body, rather than absorbing it like cotton, making it the most comfortable in hot weather.  The example garment in the pictures is a fine, sheer weight linen, though handkerchief linen is great, too.

I find flat felled seams
to be the most comfortable
finishing method for 
undergarments.

Start by sewing the sleeves together and inserting the gussets.  To do this, first line up one edge of a gusset with the top end of what will be the sleeve seam.  Sew them together right sides together.  Then sew the sleeve into a tube, stitching the adjacent side of the gusset to the other sleeve edge.  Once that's done, just stitch all the body pieces together.  I like to flat fell the seams on my camice, but French seams are also correct for the period.  Once that's done, finish the bottom edge with a narrow rolled hem (which is really easy to do on fine linen!).  Finish the sleeves either my hemming or by gathering them to narrow cuffs, and then gather (or smock, or whatever you want) your neckline to the desired width, which should at least peek out the top edge of your dress bodice.  I prefer to add a narrow neck band because it's easy and lies flat under my partlet, but it's really up to you.  Smocked and ruffled examples can be found in portraiture from the period.  Finally, if you have cuffed sleeves, add your fastenings.  I used hooks and eyes, but buttons and ties are also period.  

Adding the cuffs
And that's all there is to it; this is a really easy garment to make!  Like I said, this is a really simple garment, though the upper classes often wore embellished camice.  Blackwork, redwork, or polychrome embroidery all appear in art from the mid 16th century in Italy, as does lace insertion.  Decorative smocking is a pretty common and very attractive style of neckline finish for many different classes.  It's really up to you how much or how little embellishment you want on your garment.  Keep in mind, however, that while a simple camica looks good with a very fine court gown, a highly decorated one doesn't really work as well with working class garments.  One of the most important keys to putting together great historical costumes is remembering who you intend to portray and making sure all the pieces of the outfit fit that persona!

Tuesday, December 1, 2020

December Update

Partlet for a 1560s/70s Venetian outfit


 It's been a busy couple of months, and I haven't posted anything new, but that doesn't mean I haven't been sewing! I was working like a maniac for Halloween, making a full 1560's or '70's Venetian lady's ensemble for a friend, which was wearable for the day but still needs some work.  I also made a padded arming cap to prevent Younger Brother's helmet falling into his eyes.  I'm currently working on a lady's jerkin in gold silk (post coming soon!), but buttonholes are boring, and working on just one project for a long time sometimes gets monotonous, so I've also taken breaks from the big project to do little ones.  I made a cute embroidered apron to go with my working class dresses (a new one of those coming soon, too!), and am making myself a new camica because one isn't really enough if you plan to be in garb for a few days in a row.  

Apron embroidery


I've also done a lot of planning work for upcoming projects.  Working out the pattern for the jerkin gave me the bodice pattern I need for a fitted gown I'll be making this winter.  I'm in the middle of researching arming doublets of the mid to late 14th century as part of my brother's 14th century knight's gear.  I've mostly designed a 16th century Italian working class outfit I'd like to make for hot days at Faire in 2021.  I've figured out what pieces I'll need to make for the 15th century Florentine ensemble my mother wants, which meant hours of looking at 15th century art and showing her recreations of gowns.  I took advantage of Black Friday to get a lot of supplies for upcoming projects, including a German Trossfrau dress I've been wanting to make since I first saw pictures of them.  


Gold silk jerkin


I've also been working on getting an Etsy shop going for historical clothing.  Deciding how to stock it has been a challenge, though.  Some stock items, and other things made to order, perhaps?  I hope to have my shop going in the new year, so I'd better hurry up and figure it out!

So all in all, it's been a productive two months or so since I last posted, but it's also been the kind of productive that doesn't really mean a lot of pictures here.  Don't worry, it's all coming soon!


Blue velvet gown, not quite finished

Thursday, October 1, 2020

Linen Ruffled Partlet


 I went rogue last week while I was supposed to be working on a camicia for a friend, who needs an entire Venetian 1570's ensemble for Halloween this year.  That's barely a month away, so I really shouldn't have.  But I got bored of flat felling seams, and instead decided I needed another partlet, so I made one!  I did everything by hand, and it took about 9 hours total, so that's not really that much time wasted, right?  And it's a very cute partlet!

It's really more of a practice run in sheer linen for a partlet I'm planning to make in silk when I have time to actually take my time and do things carefully, but I'm very pleased with how it turned out.  And it looked great with my new black dress at an event over the weekend, so that was nice.  What I wanted was something along the lines of the partlets in a lot of northern Italian art from the 1550's and 60's that are very simply constructed out of linen or silk, and have a low ruffled collar, rather than a large ruff attached.  

This Portrait of a Lady and her Daughter, by Titian from around 1550 is exactly the sort of thing I had in mind for a fancy silk partlet, and I figured I should probably try it in linen first.  Besides, one can never really have too many partlets, can one?  It's hard to tell due to the painting being unfinished, but the partlet looks like it's about the same weight fabric as the camicia, so it may be linen, but you see partlets like it, with the small ruffle but not really much other decoration frequently in all sorts of sheer materials across northern and central Italy and throughout the period.  I really love everything about this portrait; this is one of several images that led me to settle on mid 16th century Venice for the majority of my historical wardrobe in the first place, and this gown was also a major source of inspiration for my blue dress, so I'm really excited to have the partlet to match!  I just bought a few yards of gold silk taffeta on sale, too, so I could have the whole ensemble...  But that's a project for another day, when I have more time!

This partlet came together really quickly!  I started with the partlet pattern I used for my Venetian falling ruff, and adjusted slightly to make the shoulders just a little wider.  My ruff tends to come un-tucked from my shoulder straps, which isn't really ideal, but adding another couple of inches to the shoulders fixed the problem.  First, I cut out my 2 front pieces, one back piece, and and a couple of long, skinny strips of linen to make the ruffle.  I decided to omit the collar for this partlet, since several of the portraits that inspired this piece don't appear to have any collar apart from the ruffle.  


First I sewed up and then flat felled the shoulder seams, just like I had on my ruff.  I then tried the partlet on to determine how much of a neck hole I should cut out, since I was lazy and didn't draft that into the pattern.  I cut out a 3/4 circle at the shoulders and top back, tried it on again to make sure it fit, and then hemmed all the edges with a little rolled hem.  Yay, functional partlet!  

Attaching the ruffle
Stitching it to the partlet

Then I went on to the ruffle.  I stitched the strips of linen I had cut together with tiny flat felled seams to make a single piece about 2 inches wide by 38 inches long.  I then made a tiny rolled hem all the may around.  Next, I made 1/2 inch gathering stitches on one side, and gathered and stitched the ruffle to the partlet.  I tried it on and found that the ruffle was a little floppier than I wanted, so I tacked it to the partlet all the way around.  Finally, I sewed some ribbon ties on under the arms and a hook and eye at the front.  Partlet complete!  And it didn't even take a full day to do by hand!  And I got to wear it for a party, so both it and the dress have made their public debut!  Much excitement!

We didn't take a lot of pictures 
at our event, so this is just about 
the only one of me in this partlet.

Sunday, September 20, 2020

Black Wool Venetian Gown


Sometimes I think I'll make something for myself that isn't from mid 16th century Venice.  Something Florentine, or from one of the other Italian city-states, or perhaps even *gasp* something from across the Alps.  Well, this is not that time.  I'm still in Venice, using fabric I bought to make a Florentine style dress from about a decade earlier...  I guess I just really love Venetian style?  

I bought this nice lightweight black wool sateen this spring after much obsessing about whether it was really an accurate fabric for this period.  I love the subtle black on black stripes, since they add interest without being too busy like some brocades.  It's wool, so I worry less about it than silk, and it was a really great price!  it looks right to me, but could I be being influenced by pop culture?  It's not something you really see in the portraits of the wealthy...  So I re-read the section on materials in Tudor Tailor, and found that both wool sateen and tone-on-tone stripes were a thing in the 16th century, so I went ahead and bought enough of this fabric to make myself a gown and a doublet.  And while this dress definitely isn't on the same level as the expensive silks seen in portraits of the noble class, it's a nice middle or merchant class look, and certainly a step up from linen or plain wool garb.  Plus while I was working on the dress, I found a few portraits that clearly are striped fabric, rather than applied trim, from mid 16th century Italy, so that's exciting:

Sofonisba Anguissola: Three children with dog    Giovanni Antonio Fasolo | I AM A CHILD

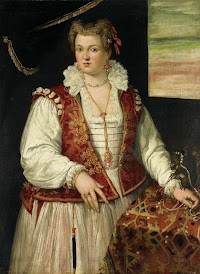
The first painting is by Sofonisba Anguissola, of some of her younger siblings, which makes the subjects from Cremona, sometime between 1570 and 1590.  I love how annoyed her younger sister looks at having to model!  I also love that the girls' dresses appear to be tone on tone stripes, probably in wool, but with applied trim.  The second is by Giovanni Antonio Fasolo, a Venetian active in northeastern Italy, and probably dates from the 1560s.  This puts some lovely stripey dresses at exactly the right time and place for me, though they are on children in both paintings.  Still, they're stripes in mid century northern Italy, so it's something! 

I started with the same pattern I used for my blue linen Venetian dress.  I traced the front of the pattern onto another piece of paper and then adjusted for a slightly longer front point and moved the strap seam to the back of the dress.  I made a very quick mockup, which I tried on over my bodies, and since the front of the bodice seemed wide enough, I decided to cut out my interlining layers.

As I've discussed before here, the use of corsets in 16th century Italy is highly questionable.  They certainly existed, as they were in use in Spain and England by mid-century, but the Italians just don't seem to have been into this trend.  I'd blame the warmer climate if they weren't so common in Spain.  What Italians seem to have done instead is reenforce their dress bodices, essentially building a corset into the gown.  It's more work every time you make a new dress, I suppose, but it's also one less layer to wear, which is ideal for those of us whose local Renfaire coincides with the hottest weeks of the year... 

Since it's both more comfortable on warm days and (probably) more historically accurate, I decided to bone the bodice of my dress so I don't need to wear my bodies under it when I don't want to.  Comparing the look and support I get from my very lightly boned blue dress and my mostly boned bodies, and debating how much time I'm willing to spend on boning chanels, I decided to compromise and make something part way between the two.  We'll see how this goes...  I can always add more if I need too, right?

I cut out my front and back bodice pieces in a layer of cotton duck canvas and a mid-weight linen blend, and started with the back piece.  First I basted the two layers of interlining together, and then stitched the bone chanel in.  Yes, that's singular.  I found on both my blue dress and my bodies that too many bones on the back of a bodice cause the top edge to stick out, rather than hugging my back, so I didn't really want to bone the back at all.  However, this dress has a back point, which I was afraid would just kind of disappear into the skirt if I didn't do something to support it.  So I'm using just one skinny piece of synthetic whalebone.  Hopefully it works!  

Instead of using a lot of bones, I'm pad stitching some of the areas where I put bones in my blue dress.  That's the center back (on either side of the bone chanel), both side edges, and about halfway between the center and the edgges.  I'm only really concerned about the edges not holding up well.  There is no boning there on my bodies, which is where I'm borrowing the boning pattern from, but those are front lacing.  This dress will lace up the sides, so I may very well need to go back and add bones along those edges to prevent wrinkles.  
Bodice front boning and pad stitching.  This is pretty 
much the same pattern as my bodies, but the 3 center 
bones almost function like a busk, so I get plenty of 
support with fewer bones.

I then repeated the process on the front of the dress, copying the boning pattern from my bodies, which are loosely based on the Pfalzgrafin Dorothea bodies featured in both The Tudor Tailor and Patterns of Fashion.  This means boning just to the under bust, rather than the whole bodice, which saves both time and money.  I really like the look of my bodies, so why not do the same thing here?  I used a mix of 4mm and 6mm synthetic whalebone for the front of the bodice, hoping for a slightly more natural look than my bodies, since there's so little evidence for corsetry in 16th century Italy.  I did alter the pattern slightly, adding a diagonal bone on either side of the bust, like I did on my blue dress.  

Once the structure was done, I cut out my fashion fabric and linen lining leaving a generous seam allowance.  I first wrapped the fashion fabric around the outside of the interling and whip stitched it down.  Then I folded the raw edges of the lining under and whip stitched it in place.  I then whip stitched the straps to the back of the bodice.

Lining the bodice.
I then finished the structural portion of the bodice construction by making about two dozen total eyelets along the two side openings, staggered for spiral lacing.  Once this was done, I laced it up using some ribbon and tried it on to make sure everything worked.  It did!  I didn't have the creasing at the side openings I had been concerned about, and the sides closed up all the way.  Yay!  

Yay, guards!
Next were the guards.  I spent a lot of time looking at Italian portraits from the middle of the 16th century and decided on a trim layout that doesn't really copy any one portrait, but is in a style that looks correct.  I used some 3/4 inch velvet ribbon, pinned and then whip stitched down as invisibly as possible.  I did this in sections to avoid stabbing myself with the pins too much. 
Once the bodice was done, I moved on to the skirt.  I used one rectangular panel for the back made from one full width of the wool outer fabric, and a slightly shaped front panel, also a full width of fabric, but with a triangle at the front center to accommodate the front point of the bodice. I simply stitched the sides of the panels right sides together, leaving 8 inches open at the top of each side to allow for getting the dress on and off.  The lining was a little more complicated because the grey linen is a little narrower than the wool, so I had to do some piecing to make the two big panels.  I cut them 2 inches longer than the outer fabric to allow a wider top seam allowance, which will hopefully pad the top edge of the skirt, giving the pleats a little more volume. 

 
Pieced skirt lining, lined up with the 
fashion fabric.


Once the lining was pieced together and the side seams of both the wool and the linen lining were sewn up, I lined up the seams and, after pinning the bottom edge and making sure the fabric wasn't bagging, I basted the top edges together, leaving my extra allowance on the lining.   Then I finished the slits at the sides by folding in the raw edges and whip stitching the layers together.  I then cartridge pleated the skirt onto the bodice.  I prefer to have more skirt volume at the back of my dresses, so I lined the skirt seams up with the bodice side openings and made bigger pleats on the back section than the front, since it's narrower.  

Once the pleats were done, I tried the dress on and discovered a couple of minor problems.  First, my back pleating was not as even as I wanted it to be, so I went back and re-did it.  The other problem was a little bigger: I discovered that the center front of the skirt was just slightly shorter than I wanted- I must have made a mistake while cutting.  To fix this, I decided to make a decorative guard for the bottom edge using the black wool and velvet ribbon.  Guards like this add a little stiffness to the hem, thereby giving the skirt a little more volume as well as adding visual interest, so they're often seen on dresses from the period.  Granted, the one on the extant Pisa gown is a tuck, rather than a separate piece sewn on, but no one will be able to see the difference while I'm wearing it, right?
Note the awkwardly short skirt front...
Oops!

To make my guard, I cut 2 three inch by one full fabric width strips on the wool to match the circumference of the skirt.  I stitched the edges together to make one continuous piece, folded it in half, turned the raw edges in, and stitched.  Then I applied some velvet trim and stitched the guard to the inside of the skirt hem, adding more velvet to cover the seam.  

Attaching the guard...
And covering the seam!  No one will 
ever notice, right?!

Dress complete!  But what to do with the sleeves?

By far the most common sleeve treatment in Venetian art seems to be panes.  Plain sleeves with shoulder ruffs are common too in the later part of the 16th century, and plain sleeves with lots of decoration in the form of trim or pinking are also common.  After spending so much time applying trim to the gown itself, I didn't really feel like doing the spiral trim I really like in a lot of mid century art, and I decided to save shoulder ruffs for a fancier gown, so panes it is!

I did some very simple paned sleeves for my blue dress, but they ended up being a lot more work than I thought they would and have had some fit and wear issues, so I decided to try a different method for these sleeves, based on Titian's Lady in White, dated around 1560. 


Titian's 'Portrait of a Lady in White,' c. 1561, on loan from the  Gemäldegalerie Alte Meister, Staatliche Kunstsammlungen Dresden » Norton  Simon Museum


I love so many things about this portrait- it's honestly about 75% of why I mostly make mid-16th-century Venetian clothes for myself, and was one of the main sources of inspiration for my blue dress.  This time, I'm using the detail of the sleeves as a guide.  It looks to me like her sleeves have four or five panes, with lots of camica sleeve helping to hold them up.  There's also a little lace decoration just below the panes, but otherwise, it's a very plain dress in a beautiful fabric with some very plain sleeves in the same beautiful fabric.  Simple and elegant.  I love it!

To make my version of my sleeves, I started with the pattern from my blue sleeves, which fit well except in the top of the shoulder, where the way I made the panes caused the sleeves to be narrower than intended.  I traced it onto some tissue paper and then made some alterations.  I softened out the curve at the top edge and made the whole thing just a touch longer, since I needed additional sleeve allowance in the length for this type of pane.  I then measured just under a third of the way down from the shoulder and drew a straight line to cut off the top part of the sleeve.  I then divided the top part into four equal widths, which would become the panes.  Then I cut out my pattern and cut out all the pieces in both the wool top fabric and the black china silk lining, leaving seam allowances.  I also cut out the pieces for the panes in cotton duck canvas, without seam allowance.  

I made up the panes first by wrapping the wool around the duck cloth foundation and then flat lining the pieces, just like I did with the bodice.  I also added two strips of velvet trim to the middle of each pane.  Then I made up the lower sleeve by sewing up the long side seam on both the wool and the silk.  I then flipped the wool inside out, inserted it into the silk so that both seams were in and lined up, turned in the raw edges, and whip stitched them together.  I then lined up the panes on the top edge, right sides together, and whip stitched them to the lower sleeve.  I connected the panes at the top edge with a couple of stitches at each corner.  Finally, I trimmed the cuff and around the bottom of the panes, added a ribbon ties to the top pane, and stitched corresponding lacing rings to the straps of the gown.  

I'm really pleased with this dress so far.  I put it o to take pictures throughout the process and right after I finished it, and it's easy to wear, corded petticoat, ruff, and all!  I was working on this in august, with the weather in the 90s, and I didn't have major problems with overheating, either, so that's a good sign for my local Faire, where the weather is nothing at all like England... Wearing it around a bit, I might decide to take the straps up just a touch, since they're occasionally sliding down very slightly, causing the partlet to come un-tucked, though the partlet might just be a touch too narrow, too.  We'll see!  I found that silk lined sleeves are much easier to get into than linen lined ones, so I'll be doing that in the future!

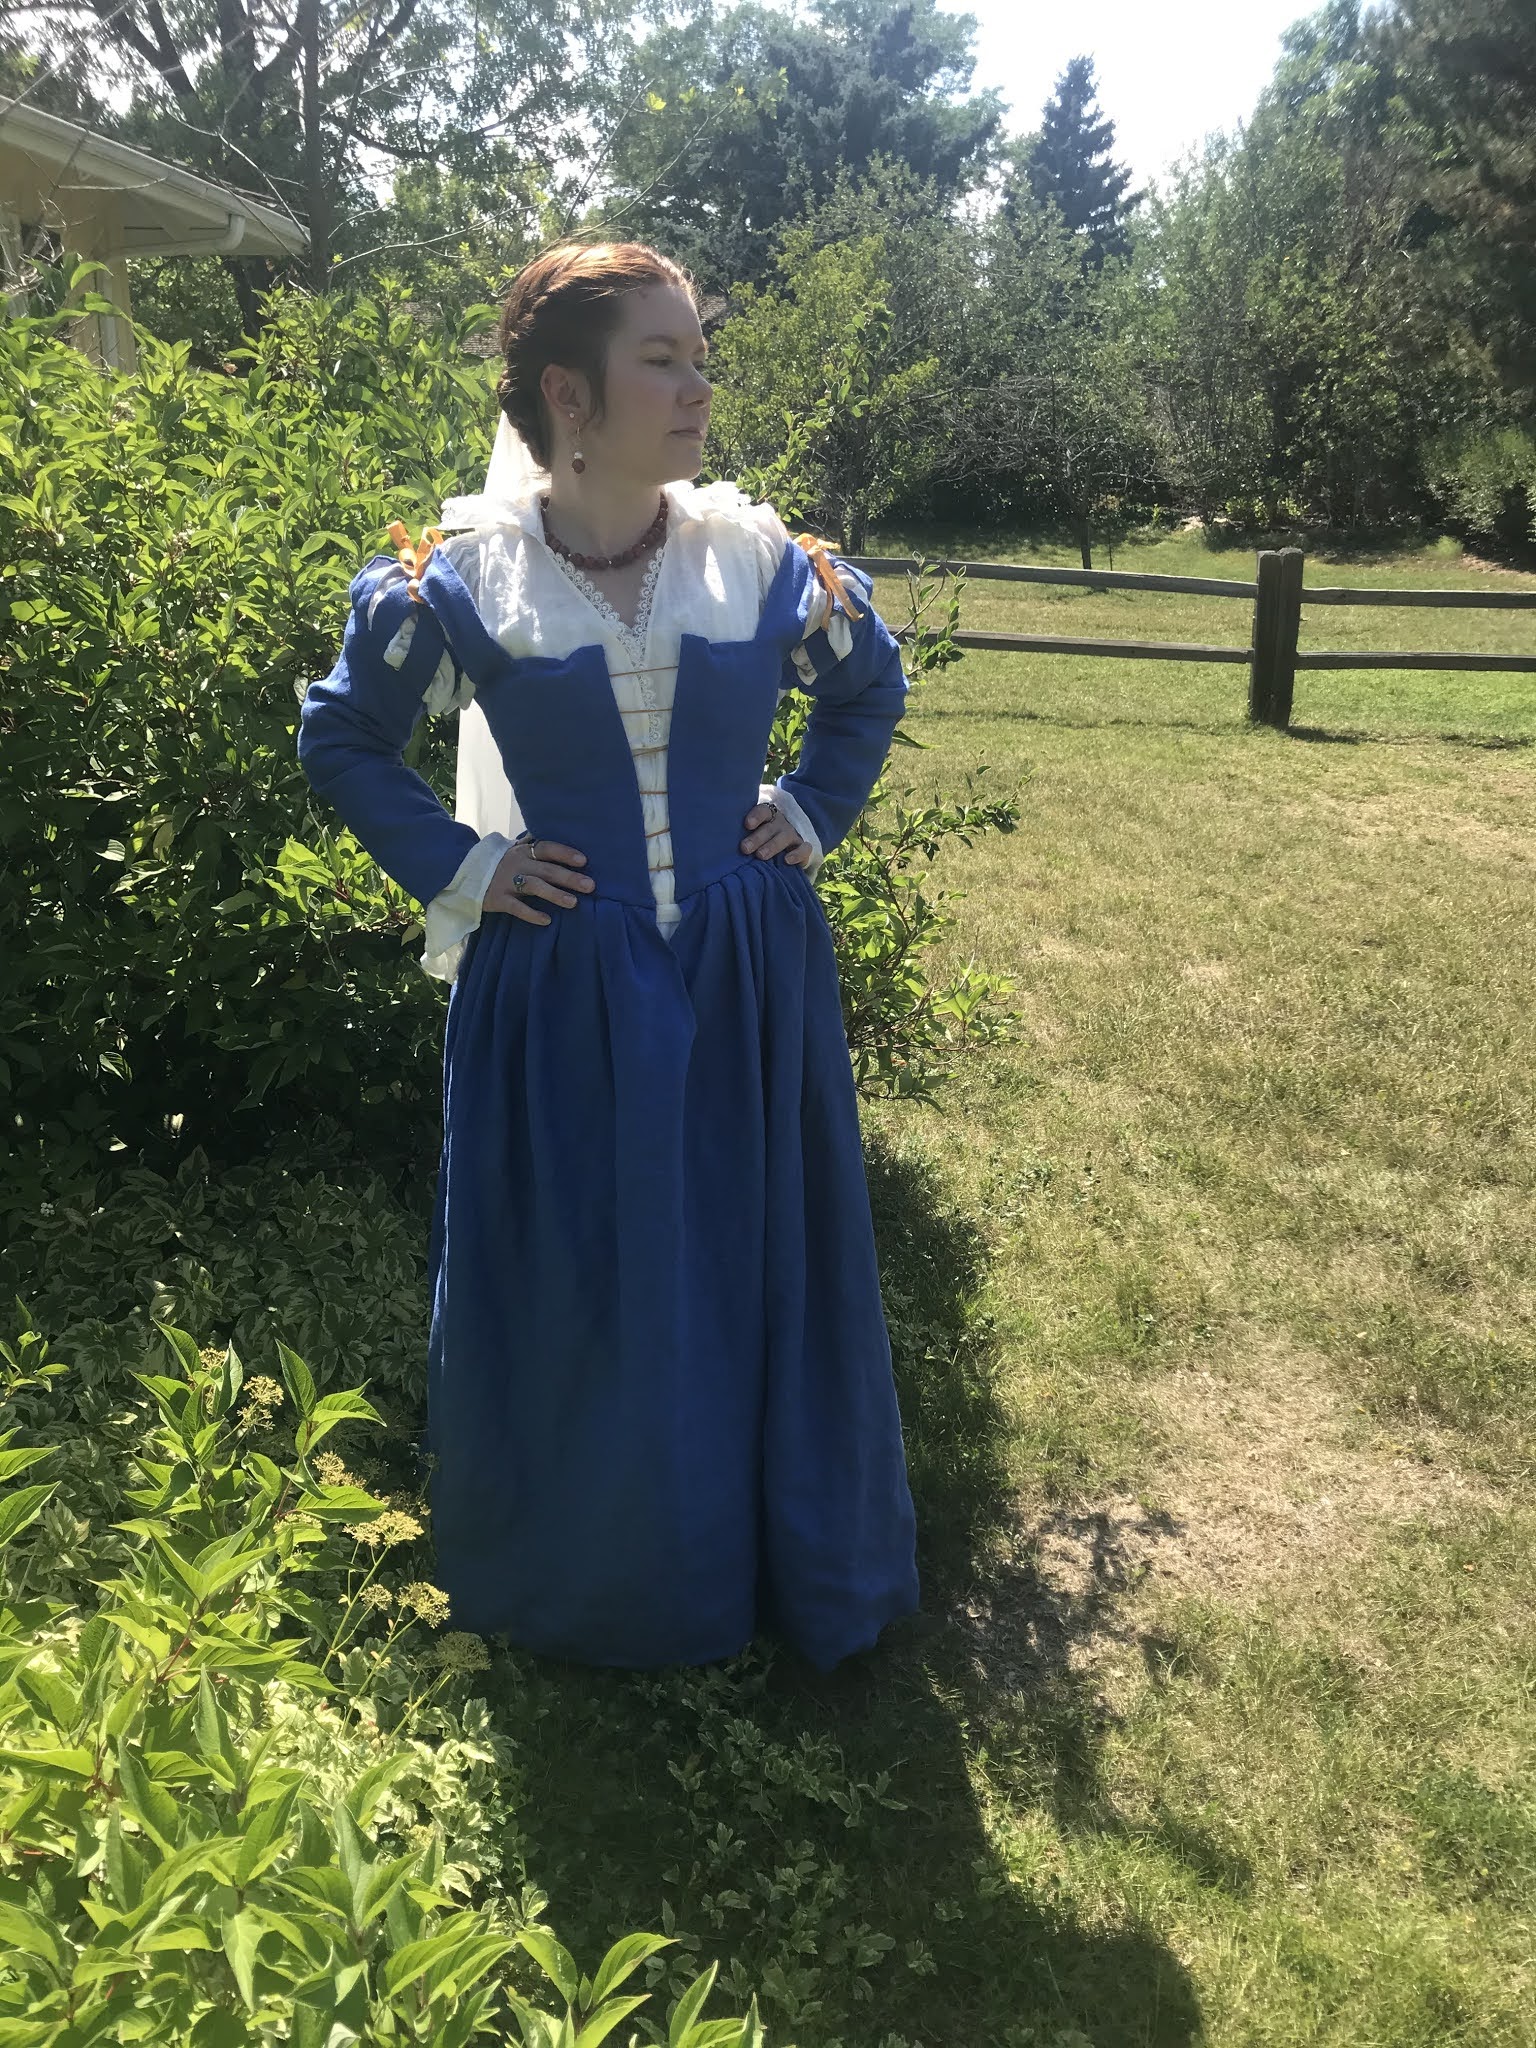
Probably the most attractive picture 
ever taken of me... Away, thou plague sore!
Or something equally disgusted and 
Shakespearean...  Yes, this is the one I'm
using for the Instagram post!

Monday, July 20, 2020

Progress on my Venetian Ensemble!


Failing a bit at "serious Renaissance portrait face," but you can
see the new accessories pretty well in this shot.  Don't mind the
modern second ear piercings I forgot to take out for pictures!

My local Renaissance Festival may have announced the cancellation of their 2020 season last week, but that doesn't mean I'm not still working on garb!  In between medieval pieces for a friend, I've done some work on my Venetian ensemble as well.  I made some coral earrings to go with my coral necklace last month, and hemmed some silk organza to make a veil.  I also bought some veil pins and another ring that works for the 16th century online.  It's not much, but I think it really helps pull my outfit together!


All the new things, plus the 2 rings I already had that can
pass for Italian Renaissance.  I'm really pleased with my
new earrings!


There's still some work to be done on this outfit.  I still think the skirt could use a little more volume to look like what you see in 1550's and 60's art, and I'm currently working on a corded petticoat that will (hopefully!) help with that.  I also plan to make a fancy underskirt, though I haven't even found fabric for that yet.  
Better serious Renaissance face here!
Unfortunately, Colorado looks
nothing like Venice.

I also need to add hooks and eyes to the slit in the skirt to hold it closed.  I thought it looked fine before, but I've been looking at more portraits, and the skirt is almost always closed just under the edge of the bodice.  I safety pinned it for these pictures, which makes it hang a little strangely.

I really need to fix my sleeves, too.  They're a little too tight at the top edge, which makes getting dressed difficult and also causes my sleeves to work their way down my arms, pulling the straps of the bodice with them.  Venetians were fond of the edge-of-the-shoulder look, but these are pulling too far and making it a little difficult to use my arms.  Plus it's creating a weird situation with my camica and partlet that needs constant adjusting.
The weird sleeve-strap-partlet-camica situation
is easier to see here.  I think I didn't leave enough
ease when making the sleeves, and then went back
to work after the quarantine and my arms got a little
more muscular, so the problem with fit became
much more obvious.

I plan to fix this by removing the stitches holding the panes together and adding a slightly bigger strip of fabric around the top edge of the sleeve in their place, adding maybe an inch to the sleeve circumference.  Will update with results.  I also plan to make a second pair of sleeves out of a remnant of silk brocade, which I'll do in the new way if that works better.  I also think that part of the problem is with my camica being a little too wide in the neck, though I haven't decided yet if I'm going to re-work it or just make a second one.  That depends on the results with the sleeves.  All in all, though, things are coming together nicely.  Now I just need somewhere to wear this...  Perhaps the grocery store?  Or my day job?


Another veil pic.  Because I think my veil is awesome.
So flowy and cute!  I need to get better at pinning it,
though.  


Monday, May 25, 2020

Venetian Partlet/ Falling Ruff

My new Venetian partlet/ falling ruff!


The ruff is probably the most quintessential piece of late 16th century fashion, but as far as I can tell, the big round dinner plate ruffs you see in late Elizabethan England were never common in Venice, and in the 1560s and '70s, the "ruff" seems to be more of a ruffle attached to the partlet.  Since most of my wardrobe is mid-century Venetian, I decided to make one of these.

The Venetian "falling ruff" is pretty common in portraits from the second half of the 16th century, as are partlets with no ruffle.  Some of the partlets appear to be linen, and others appear to be sheer silk, though the ruff almost always appears to be linen and/or lace.  This leads to the interesting idea that perhaps some ruffs were detachable, and not an integral part of the partlet, but for the sake of simplicity, I decided to make mine one piece.  I may make another one in the other style at a later date, though, in a fancier fabric.

Francesco Montemezzano, 1565-75
This partlet/ruff appears to be linen, trimmed
in lace.  I think I got pretty close to this look!
For this partlet/ruff, I'm using the same sheer white linen I use for 16th century chemises.  I used it for a ruffle collar on an Elizabethan chemise once, and it worked well for that, so why not, right?  It's not going to be completely plain, though!  Many of the partlets and ruffs in portraits appear to be decorated, often with pearls, lace, or blackwork or metallic embroidery.  I'm not very good at embroidery and mostly see pearls on collarless partlets, so I'm using some lace to make this elegant enough to go with the silk gown I'm planning.


The internet, Tudor Tailor, and common sense tell me a partlet pattern looks something like this:


Two front pieces and one back piece, in this case with a rectangular collar and a ruffle.  The measurements on my diagram are mine.  Shoulder seam to neck, and top of shoulder to underbust for the front, Shoulder seam to shoulder seam for the back, and collar bone to collar bone around the back for the collar.  Venetian partlets in portraits usually appear to have a v-neck effect, so I made my pieces a little narrow at the top and wider at the bottom.  There should also be a small semicircle cut out of the middle of the back top to accommodate the neck.  I'm going to do that when I have the shoulders sewn up, though, because I'd rather eyeball it than do math.  I'm also opting to make ties for the bottom out of ribbon rather than sewing them, because this makes my life a lot easier.  Some people pin their partlets on, or just make them long enough that they stay in place, but I prefer ties at the sides, so that's what I'm doing.


Very long ruffle, stitched together and
hemmed.  See my tiny (less than 1/2
inch) seam?
First, I attached the front pieces to the back with flat felled seams at the shoulders.  This is my favorite method of finishing seams because it hides all the raw edges without the bulk of French seams, but if you prefer French seams, they're also common in period.  Next, I tried on the partlet and cut out the back neckline.

Then I moved on to the ruffle.  I cut out my ruffle in several pieces to conserve fabric, resulting in a total length of about 48 inches, 4 times the length of the collar.  Since it was in pieces, the first step was to sew the pieces together, again with flat felled seams.  I then hemmed one side and both ends, and then attached the lace.

Sewing on the lace!
This is how the ruffle looks pinned to
the neck band.  Time to stitch!
Next, gathering the ruffle into the neck band.  Using very small gathering stitches, I gathered the ruffle to the length of the neck band. Then I pinned and stitched the ruffle to one of the neck band pieces.  This was kind of a pain.  Normally, I would use a whip stitch and be sure to catch either side of each pleat, but I was worried about the raw edges of this delicate linen holding up and wanted a bigger seam allowance, so instead, I stab stitched the two together, still stitching on either side of each tiny pleat.  Kind of annoying, especially since the edges of the lace kept catching the thread, but it worked.
Whip stitching the ruffle to
the neck band.

Then I sewed the neck band to the partlet, leaving seam allowances free at either end.  In retrospect, I should have pinned both neck pieces to the ruffle at the same time, but I didn't think about that until the first one was sewn on already, so the next step was attaching the second neck band piece to the ruffle.  This time, I just pinned the pieces right sides together and whip stitched over the edges, which was a mistake- I missed some of the raw edges of the ruffle, and had to go back and redo sections.  This may not have been a problem if I had been more careful the first time, but then again, I couldn't see all the layers very well.

Finally, I just had to attach the second neck band piece to the partlet.  I did this by folding the raw edges under and using tiny whip stitches, making the stitches as invisible as possible.  I put this seam on the outside of the partlet rather than the inside like I normally would because the ruffle falls over this seam, so it's actually less visible than the inside of the neck band.  This is also the side of the ruffle with visible stitching attaching the lace and holding the pieces together.  The outside of the ruffle is the underside, so this won't show when it's being worn.

Using small stitches to attach
the neck band to the partlet.
Once all the pieces were sewn together, all the "tricky" parts of this project were done!  Now all I had to do was hem the partlet and add the underarm ties and trim on the neckline.  Nothing complicated here, so this all went pretty quickly.

That's it!  All done!  One step closer to a complete mid-16th-century Venetian ensemble!


One step closer to a complete ensemble!