Tuesday, April 28, 2020

Making My Blue Venetian Dress


As I mentioned in my previous post, this dress was meant to be practice- a sort of overdone mock-up- for the green silk Venetian gown I'm planning to make soon.  I make no claims for the historical authenticity of making a dress like this in linen- that's a subject for a future post!  Since the whole point of this project was to make sure my pattern really fit and see if my technique needed any tweaking before making the dress in the expensive fabric, I opted not to spend money on this project and use what I had in my stash, which was a pretty blue heavyweight linen for the fashion fabric and a light linen/cotton blend for the lining.  I did buy a few yards of gold silk ribbon for the lacing, but otherwise, this was all with fabric I already had on hand!

This bodice pattern, on top of the
one I cut it down from.  See the
difference?
The first step of this project was figuring out my pattern.  I have a bodice pattern I made a long time ago by tracing a bodice I'd bought at my local Renaissance fair and then adjusting as needed to get the look and fit I wanted for a kirtle I made, which fits well.  To get the pattern for this bodice, I traced that pattern and then adjusted it a bit.  I took in the sides of the back piece a bit and removed about an inch and a half from the center front, on either side of the lacing.  This moved the seams from the middle of each side to the side back of the dress and allowed for the open front.  I made a quick mock-up of the bodice, found that it seemed to fit the way I wanted, and decided to go ahead and cut out my canvas interlining and my lining fabric.  Note: this step went quickly because I was just adjusting a bodice pattern I've worked with before for several projects.  If your pattern is new, expect to make several mock-ups!

First I basted together the lining and interlining along the bottom and sides.  Then I added boning channels, three on each front panel and three on the back, and inserted the plastic bones.  Next time, I'll probably bone the front a little more heavily, but this works well enough.  I'll probably also have two layers of interlining, one canvas and one linen, next time.  I didn't this time because I was afraid I'd run out of fabric, and this dress isn't meant to be formal anyway, so it really doesn't matter what the inside looks like. 

Adding the lacing ribbons.  Next time, I'll add
another layer of lining so the boning channels
aren't visible.  

Once the bones were inserted, I attached the ribbons the lacing goes through, stitching the ribbon down every inch or so and making sure the openings for the laces are directly across from each other.  This is a technique for ladder lacing that's all over the internet, and it works well, but I'm not sure of its historical authenticity.  I may use lacing rings next time, as I think they would be sturdier and easier to lace up.
It fits!

Next, I tried on the bodice and it fit!  Yay!  Time to cut out the fashion fabric!

I cut the blue linen out with a wide seam allowance, pinned it to the outside of the bodice, made sure there were no wrinkles, and folded the raw edges under while pinning it to the inside, clipping along the curves as needed.  Then I whip stitched the blue fabric down making sure to catch the canvas interlining but not go all the way through and leave visible stitches.  Finally, I pinned the bodice pieces right sides together and back stitched everything together.  Bodice is done!

Stitching the blue fashion
fabric to the lining.  
Time for the skirt!  I cut out two big rectangles of my desired skirt length plus seam allowance from the fashion fabric, selvedge to selvedge because while this results in a second side seam, it was a more conservative use of fabric.  The fabric was 59" wide, so two panels make for a little over 3 yards worth of skirt- plenty of volume!

Then I laid one of my panels over the lining fabric to cut that out the same way, and realized that my lining fabric was only 54" wide.  Oops...  So I made a third, smaller panel for the lining, which worked, but looks a little silly.  Oh well, no one is looking at my dress lining, right?

Gathering the skirt to the
bodice.  
So I sewed my fashion fabric panels together, then did the same on my lining, leaving an 8" gap at the top of the right side on both for my pocket.  Then I sewed the bottom edge of the two pieces right sides together, flipped them the right way out, folding them so that the lining wouldn't show, and pressed.  Finally, I made a 6' slit at the top front, finished that and the pocket opening, and made a little hem at the top.  Skirt finished!

The last step was to gather the skirt to the bodice, which I did by gathering half the skirt at a time and pinning it to the bodice, right sides together, then whip stitching the two together, making sure to catch the canvas interlining as often as possible, and making 2-4 stitches per pleat.

Dress is done!  Now time for sleeves!

I made a pair of sleeves a while ago that turned out to be a little too big, so I tried those on, figured out how much I needed to adjust the pattern by, and made a mock-up.

Like my grocery bag pattern?  I cut down the pattern from
an old pair of sleeves that didn't really fit, so there's a lot
of confusing writing on the other side, but this is the basic
pattern I used for these sleeves, and would also use for sleeves
without panes. 
Still too big!  But mock-up #2 fit, so I cut the panes and stitched them together at the top, and it fit!  So I cut out my blue linen and my lining.  I pinned them together (right sides together if your fabric has a right side!) and drew lines on them 1.5" apart and 4" long for the panes.  Then I sewed around the panes on one sleeve, leaving a small seam allowance.  Then I cut along my lines, flipped them right sides out, and discovered that the seam allowance wasn't wide enough.  The cotton/linen blend I used as a lining frayed a lot!  So I whip stitched over the edges to protect them, then I flipped the fashion fabric and the lining inside out, and stitched those seams, finished the opening, and finally stitched the panes together with a couple of stitches at each corner.  Then I repeated the process on the other sleeve, leaving a bigger seam allowance between the panes this time!
Finished sleeve!  If you look closely,
you can see where the lining started
to fray when I flipped it right side out,
but I don't think people will notice when
I'm wearing it.  

Finally, I just had to attach the ribbon ties to the sleeves and make eyelets in the shoulders of the dress to lace them through.  Done!

And then I tried the dress on to take pictures, and discovered that I had made a mistake on the skirt.  This is a V-shaped bodice, so I should have shaped the top of the front panel to compensate for the bodice length, but I didn't.  The difference in length was noticeable, and the front hem was dragging on the ground a little, so I had to fix it.  I had two choices: either fix the skirt at the top by undoing the pleating, hem, and front opening, or fix it at the bottom by ripping out the seam between the fashion fabric and the lining and hemming all the way around.

I went with the second option.  I ripped out the bottom seam, pinned the hem at the correct length, and trimmed a little off the front.  Then I folded the raw edges in and used an invisible hem stitch all the way around.  All better!


Fixing the hem.  I ripped out the seam, found the correct front length, pinned, and hem stitched. 

The hem lengths match!  Yay!


I know this dress started out as an overdone mock-up, but I really love how it turned out!  It's honestly one of my favorite things I've made yet.  I will definitely be wearing it a lot, if we're allowed to have events for me to wear it to this summer!

Monday, April 27, 2020

Blue Venetian Dress


My newest dress!  It's actually still in progress, as I realized when I put it on to take pictures that I messed up a little and the hem is a couple of inches longer in front... more on that later!

This style of dress is one of my favourites ever.  I love the simplicity compared to a lot of contemporary styles.  Fewer layers I have to make, yet the finished outfit looks just as fancy!

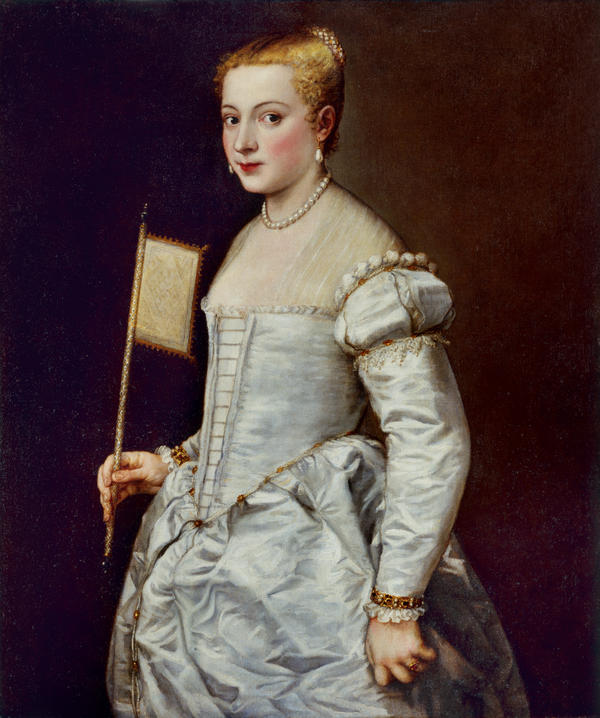
Titian painted<em> Portrait of a Lady in White </em>around 1561. She's captivated historians and art lovers for centuries — but nobody knows who she is.
Portrait of a Lady in White, Titian, 1561
Unknown English lady, possibly the Marchioness of
Northampton, painted in 1569


See what I mean?  The first portrait is by the Venetian artist Titian, painted around 1561, and her gown is pretty typical for Venice in that period.  Note the simple lines and the almost complete lack of decoration- just a little lace on the sleeves, a silk partlet, and a little jewelry.  While the fabric of the gown is a very luxurious white silk satin, there isn't really a lot of decoration.  Next to this outfit, the second portrait, from England in 1569, looks really busy!  Guards and shoulder rolls on her bodice, neck and wrist ruffs, all that embroidery (I think?) on her partlet and sleeves, three distinct necklaces, a bonnett... There's a lot more going on here, yet the Venetian style looks every bit as formal.  While an Elizabethan ensemble like this one would take me months, I just made a Venetian dress, sleeves, and ruffled chemise in two weeks.  Yay for less effort!

So based on the principle of least effort to coolest dress, I decided to go with a Venetian gown for my one fancy "court" gown.  No, that's not what this post is about.  You see, I ordered a whole bunch of very pretty green silk for my fancy gown, but I'm terrified of messing up a project in fabric that expensive! I know myself, OK?  The number of mistakes I make is directly related to how expensive the material is!

Instead of just mocking up the bodice and then cutting the silk and going for it, I decided to try making the whole thing in some blue linen I had in my stash as a practice round before working with the expensive stuff.  This was a good decision, as it turns out, because I did make a couple of mistakes and learned a lot in the process that will make my fancy dress even better when I finally get around to making it.  However, mistakes and all, this is my new favourite dress!  I'm looking forward to having somewhere to wear it!

Check back for the full step-by-step dress diary in a couple of days, when I've had time to fix the hem!

Update!  Full dress diary here.


Can you tell the front is longer than the back?
This is why we don't cut out pieces when we're tired!


Welcome!

So much more stylish!  Seriously, why did we stop
dressing like this?!!
Hello and welcome!  I'm Christina, and I'm addicted to Renaissance fashion.  No really, I have a problem...  Who needs a modern wardrobe, anyway?  The 16th century was much more stylish!

While I've been sewing for as long as I can remember, I first started making an effort to make properly historically accurate clothes last year, using Renaissance art as inspiration and the internet to figure out how to make things.  I find dress diaries to be particularly helpful, especially when I'm learning to do new things, and what I hope to do here is show you how I make historical clothes and how you can do it, too!  If you don't feel comfortable or have time to do it yourself, though, I do take commissions, and I plan to have an Etsy shop open soon!

My focus is on northern Italian- and especially Venetian- styles from the second half of the sixteenth century, but I occasionally take detours to other times and places in medieval and renaissance Europe, so you'll see that here, too.  My brother's 12th century surcoat is my next project, and I'm in the middle of a Viking ensemble for a friend.  I like to explore other aspects of daily life in the past, too, so there may be occasional food posts...  Apparently, bacon and cinnamon sugar on spaghetti was a thing in the 15th century, and I'm kind of intrigued!

Update!  I tried Renaissance cooking!

Anyway, without further rambling, welcome to what can best be described as my Renaissance lifestyle blog!  Enjoy!