 |
| My new Venetian partlet/ falling ruff! |
The ruff is probably the most quintessential piece of late 16th century fashion, but as far as I can tell, the big round dinner plate ruffs you see in late Elizabethan England were never common in Venice, and in the 1560s and '70s, the "ruff" seems to be more of a ruffle attached to the partlet. Since most of my wardrobe is mid-century Venetian, I decided to make one of these.
The Venetian "falling ruff" is pretty common in portraits from the second half of the 16th century, as are partlets with no ruffle. Some of the partlets appear to be linen, and others appear to be sheer silk, though the ruff almost always appears to be linen and/or lace. This leads to the interesting idea that perhaps some ruffs were detachable, and not an integral part of the partlet, but for the sake of simplicity, I decided to make mine one piece. I may make another one in the other style at a later date, though, in a fancier fabric.
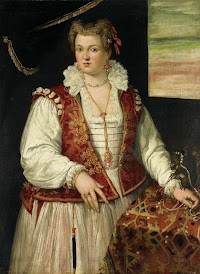 |
| Francesco Montemezzano, 1565-75 This partlet/ruff appears to be linen, trimmed in lace. I think I got pretty close to this look! |
The internet, Tudor Tailor, and common sense tell me a partlet pattern looks something like this:

 |
| Very long ruffle, stitched together and hemmed. See my tiny (less than 1/2 inch) seam? |
Then I moved on to the ruffle. I cut out my ruffle in several pieces to conserve fabric, resulting in a total length of about 48 inches, 4 times the length of the collar. Since it was in pieces, the first step was to sew the pieces together, again with flat felled seams. I then hemmed one side and both ends, and then attached the lace.
 |
| Sewing on the lace! |
 |
| This is how the ruffle looks pinned to the neck band. Time to stitch! |
 |
| Whip stitching the ruffle to the neck band. |
Then I sewed the neck band to the partlet, leaving seam allowances free at either end. In retrospect, I should have pinned both neck pieces to the ruffle at the same time, but I didn't think about that until the first one was sewn on already, so the next step was attaching the second neck band piece to the ruffle. This time, I just pinned the pieces right sides together and whip stitched over the edges, which was a mistake- I missed some of the raw edges of the ruffle, and had to go back and redo sections. This may not have been a problem if I had been more careful the first time, but then again, I couldn't see all the layers very well.
Finally, I just had to attach the second neck band piece to the partlet. I did this by folding the raw edges under and using tiny whip stitches, making the stitches as invisible as possible. I put this seam on the outside of the partlet rather than the inside like I normally would because the ruffle falls over this seam, so it's actually less visible than the inside of the neck band. This is also the side of the ruffle with visible stitching attaching the lace and holding the pieces together. The outside of the ruffle is the underside, so this won't show when it's being worn.
 |
| Using small stitches to attach the neck band to the partlet. |
That's it! All done! One step closer to a complete mid-16th-century Venetian ensemble!
 |
| One step closer to a complete ensemble! |
No comments:
Post a Comment