Monday, July 20, 2020

Progress on my Venetian Ensemble!


Failing a bit at "serious Renaissance portrait face," but you can
see the new accessories pretty well in this shot.  Don't mind the
modern second ear piercings I forgot to take out for pictures!

My local Renaissance Festival may have announced the cancellation of their 2020 season last week, but that doesn't mean I'm not still working on garb!  In between medieval pieces for a friend, I've done some work on my Venetian ensemble as well.  I made some coral earrings to go with my coral necklace last month, and hemmed some silk organza to make a veil.  I also bought some veil pins and another ring that works for the 16th century online.  It's not much, but I think it really helps pull my outfit together!


All the new things, plus the 2 rings I already had that can
pass for Italian Renaissance.  I'm really pleased with my
new earrings!


There's still some work to be done on this outfit.  I still think the skirt could use a little more volume to look like what you see in 1550's and 60's art, and I'm currently working on a corded petticoat that will (hopefully!) help with that.  I also plan to make a fancy underskirt, though I haven't even found fabric for that yet.  
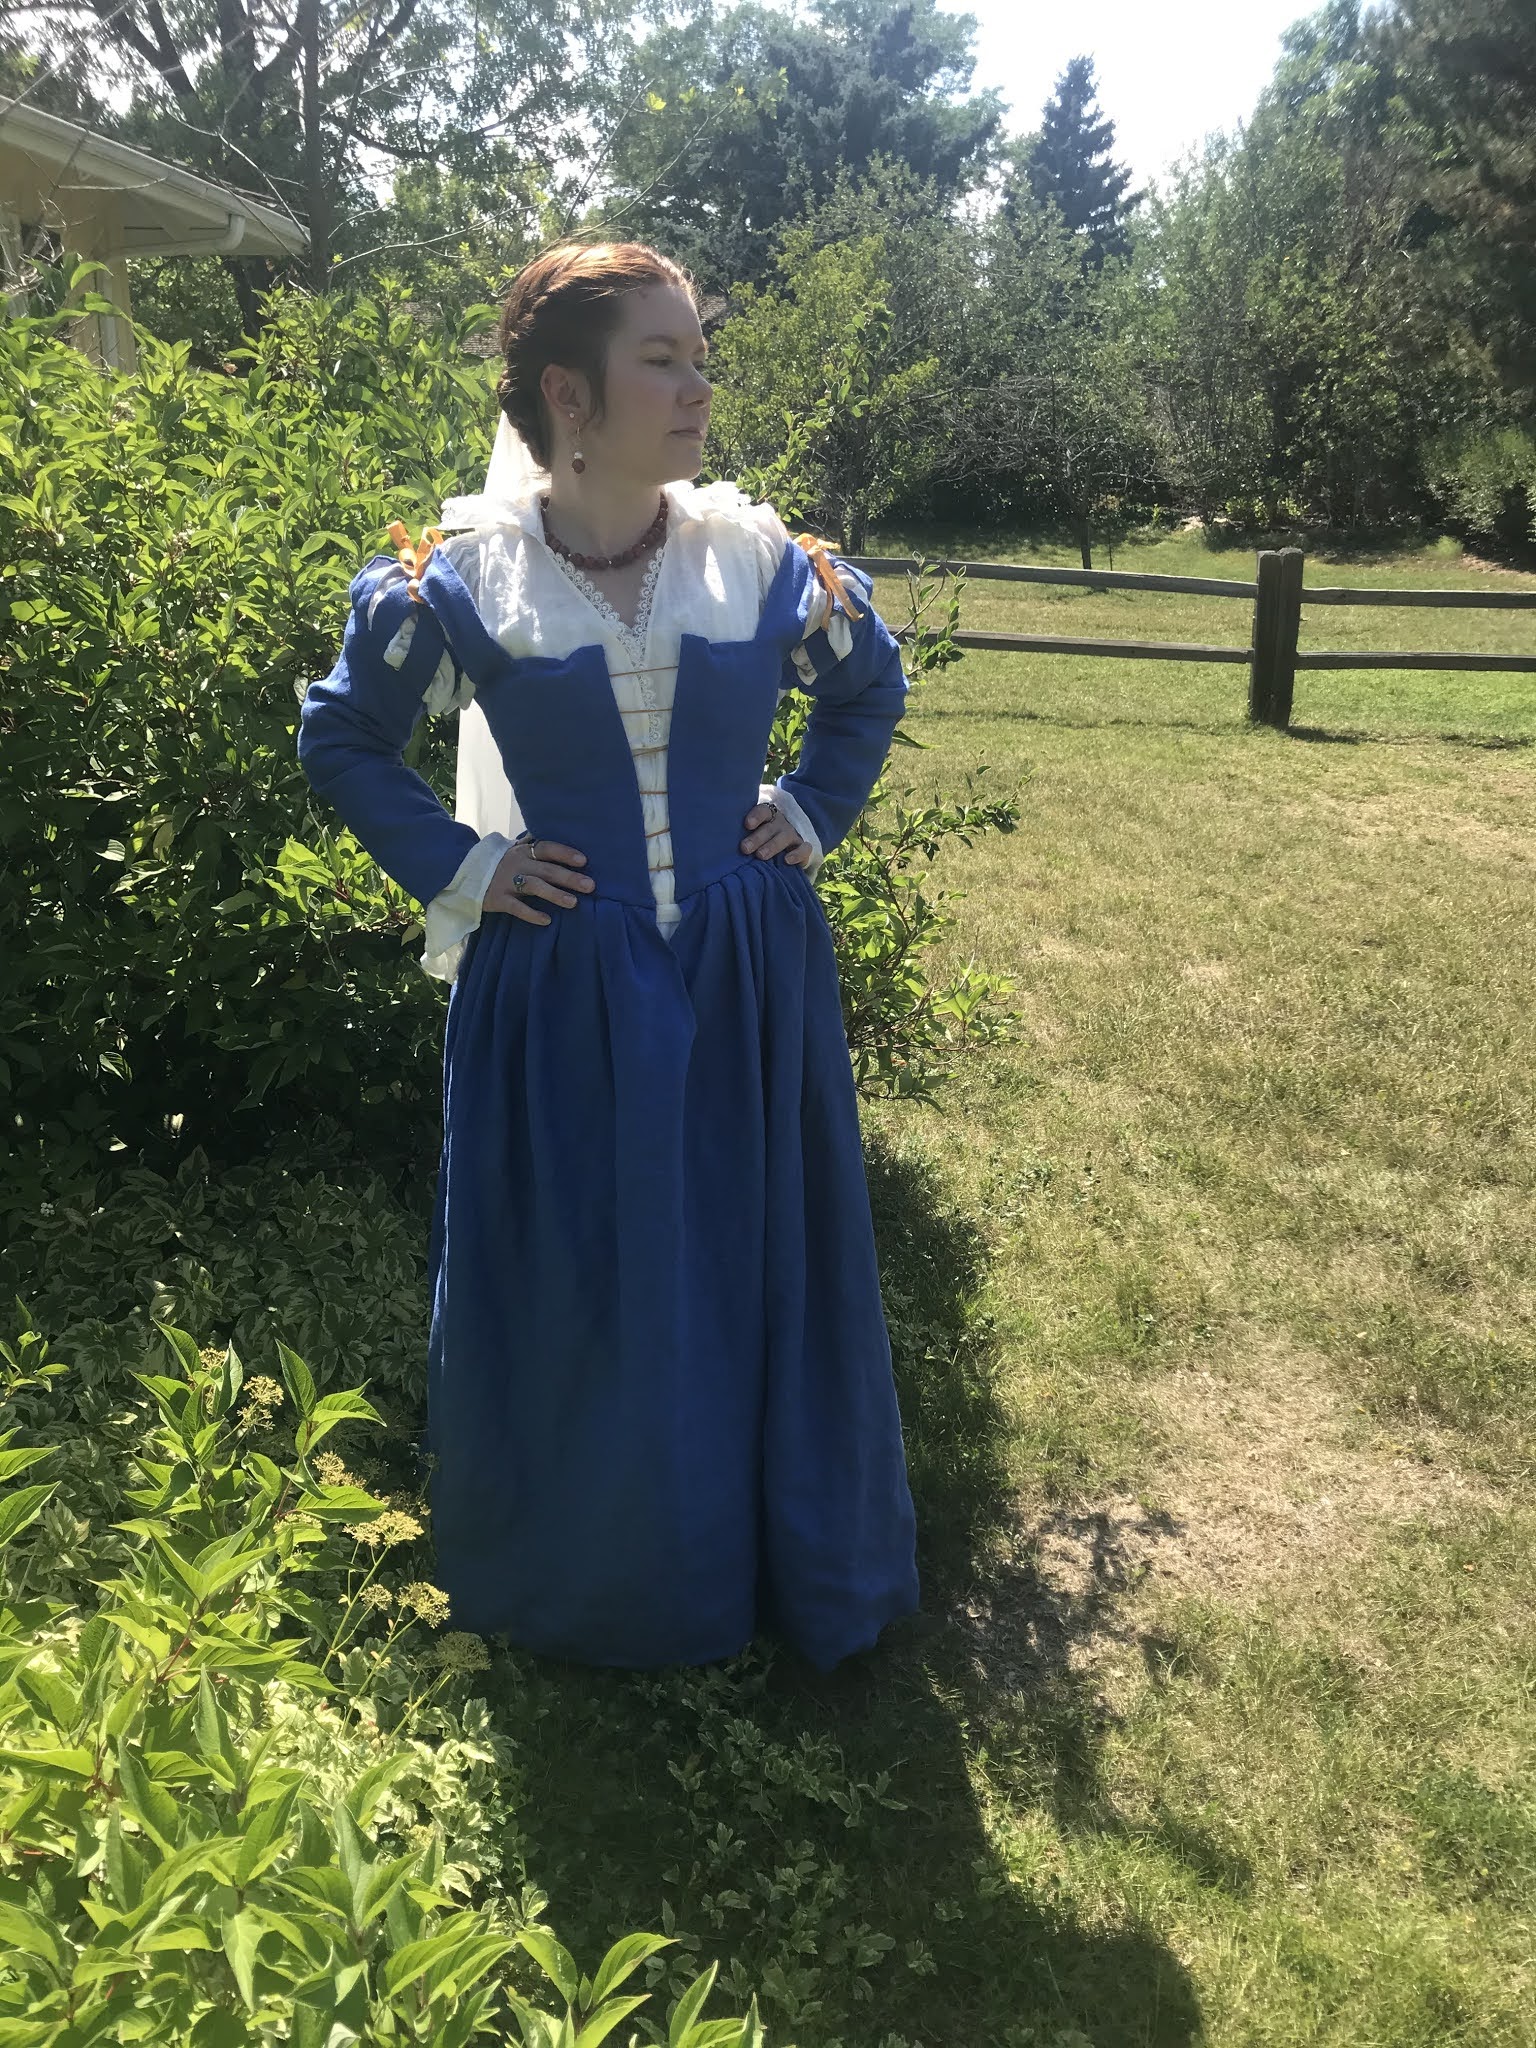
Better serious Renaissance face here!
Unfortunately, Colorado looks
nothing like Venice.

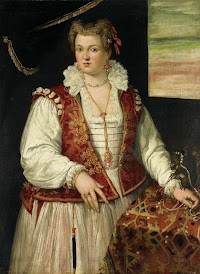
I also need to add hooks and eyes to the slit in the skirt to hold it closed.  I thought it looked fine before, but I've been looking at more portraits, and the skirt is almost always closed just under the edge of the bodice.  I safety pinned it for these pictures, which makes it hang a little strangely.

I really need to fix my sleeves, too.  They're a little too tight at the top edge, which makes getting dressed difficult and also causes my sleeves to work their way down my arms, pulling the straps of the bodice with them.  Venetians were fond of the edge-of-the-shoulder look, but these are pulling too far and making it a little difficult to use my arms.  Plus it's creating a weird situation with my camica and partlet that needs constant adjusting.
The weird sleeve-strap-partlet-camica situation
is easier to see here.  I think I didn't leave enough
ease when making the sleeves, and then went back
to work after the quarantine and my arms got a little
more muscular, so the problem with fit became
much more obvious.

I plan to fix this by removing the stitches holding the panes together and adding a slightly bigger strip of fabric around the top edge of the sleeve in their place, adding maybe an inch to the sleeve circumference.  Will update with results.  I also plan to make a second pair of sleeves out of a remnant of silk brocade, which I'll do in the new way if that works better.  I also think that part of the problem is with my camica being a little too wide in the neck, though I haven't decided yet if I'm going to re-work it or just make a second one.  That depends on the results with the sleeves.  All in all, though, things are coming together nicely.  Now I just need somewhere to wear this...  Perhaps the grocery store?  Or my day job?


Another veil pic.  Because I think my veil is awesome.
So flowy and cute!  I need to get better at pinning it,
though.  


Monday, July 13, 2020

14th Century Belt Purse


This piece is part of a medieval ensemble for a friend I've been working on on and off for the last several months, designed around her wanting to wear a dress but also carry a sword for RenFaire.  As such, we were more concerned with putting together something fun than being particularly historically accurate.  As such, the various pieces of the outfit don't all come from the same time period, but it's going to look cool for Faire, which is all that really matters in this case.  The purse itself is pretty accurate, though, so I thought I'd share it here!

This purse is based on the drawstring belt purses seen in a lot of late medieval manuscripts, which come in a variety of shapes.  These purses are mainly from the 14th and 15th centuries, putting them about 400-500 years after the dress and hood this is going to be paired with, but it's for fun, not reenactment, so I decided to go with it.  Besides, they're cute, but wouldn't go with my 16th century wardrobe, so when else am I going to make one?
71 Best Kirtles images | Medieval clothing, Medieval costume ...  83 Best Garb - GFD Necklines images in 2020 | Medieval art, 14th ...  Image result for "15th century" gown with demicient belt ...

Most of the manuscript purses appear to be rectangular, though some are a little pointier.  For no particular reason, I decided to make my purse pointed at the bottom, though it turned out a little more round than pointy.  I can't quite tell of the purse on the left has tassels on the drawstrings or not, but the one on the right clearly has either small tassels or pom poms all over it, so I decided that a little decoration was acceptable.  I also chose to coordinate the purse with the rest of the outfit for no particular reason other than that I didn't want to have to find fabric for it and I had leftovers from the dress and hood.  I also chose not to buy cording or decoration, again mostly to avoid overspending, and tried making my own braided cord.

The grey wool hood fabric and the red
linen dress fabric look cute together,
so why not use them, right?
Once I figured out what I was doing, this purse came together really quickly.  I cut out front and back pieces in both the red linen lining and the grey wool fashion fabric.  I sewed the lining pieces together "right" sides together, and then repeated the step with the wool, this time leaving a gap at the center bottom for the middle tassel.  Then I made the tassel by simply folding 6 strands of yarn in half and knotting them, then trimming the ends to the same length.  I inserted this in the gap in the wool body of the purse, leaving the end I wanted to show between the right sides of the fabric.  I then flipped the whole thing inside out and pressed the seams.

Next, I made the braids.  For the strap, I used 12 strands of a medium thickness acrylic/wool blend yarn, tied a knot in one end, divided into 3 sections, and braided tightly.  When that was done, I knotted the other end and cut down the ends to make tassels.  I then repeated the process with only 9 strands of yarn to make the drawstring.

Making the drawstring channel. 
Lots of pins to hold the fabric in place.
Inserting the drawstring
Closing the channel and
finishing the edges.


The last step!  Whip stitching
the strap to the bag.
Then back to sewing.  I inserted the lining into the outer shell of the bag and made sure the seams lined up properly.  Then I backstitched a seam near the top to create a channel for the drawstring.  I made 2 eyelets in the center front of the drawstring channel, inserted the drawstring, and then finished the raw edge of the lining as well as the top of the channel by folding the raw edge in and whip stitching the lining to the shell.  I didn't have any raw edges to finish on the shell because I had used the selvedge as the top edge while cutting.  Finally, I pinned the strap to the sides of the bag and whip stitched them in place.  Done!

This was probably the easiest project I've done in a while, and certainly the quickest.  And I (kind of) learned a new skill, so yay!  I was really pleased with how the braids came out, as I was sceptical of using yarn for trim, but they're cute!  I'm now considering making braided trim for an upcoming project rather than spending on the velvet ribbon I was going to buy... We'll see!


Wednesday, June 24, 2020

16th century Bodies (aka Corset)

Finished front
Pardon my phone (and my messy workspace!)
Finished back


There's a lot of debate among costumers as to whether or not corsets- commonly called "bodies" or "pairs of bodies" in period sources- were used much in 16th century Italy.  There's loads of evidence for them in England by the Elizabethan period, quite a bit in Spain, and even an extant pair from Germany, but the Italians seem to have prefered stiffened dress bodices rather than separate support garments.  This makes sense to me, since Italians were living in a much warmer climate than the English or the Germans, and so presumably would have been more comfortable with fewer layers.  That said, by the end of the century, dresses in portraits look stiff enough to me that I suspect either the bodices were made like corsets or the Spanish pair of bodies had come in to style.  There is an extant pair from Florence dated to 1562, but it's unclear whether this is a "pair of bodies", or corset, or a "petticoat bodies", which functions to hold up an attached underskirt as well as provide a little bust support.  Either way, though, this garment belonged to Elenora of Toledo, the Grand Duchess of Tuscany, who was of Spanish origin, so it's hard to be sure how much this says about what Italians were wearing.  Personally, I'm of the opinion that in Venice at least- which is where my focus is- corsets weren't in common use until very late in the century.

So why am I making one, you ask?  I do want to make at least one Elizabethan ensemble, so I need a pair of bodies for that- I have an could use a petticoat bodies, but that's a lot more bulk than I want to wear, especially at outdoor summertime events.  I'm also planning a doublet and hose for myself, and I don't really want to go to the trouble of trying to make a doublet bodice supportive enough.  I refuse to wear a modern bra under 16th century clothes, so a pair of bodies is required.  Finally, I intend to eventually make a Florentine dress in a style similar to the one Elenora wore over her bodies, and I'll need it for that outfit!

Since examples are few and far between for these things and the time and place I focus on probably didn't use bodies anyway, I wasn't especially concerned with historical perfectionism on this piece.  Tudor Tailor has patterns for two English styles of corset, but they're both fully boned and I don't really want to spend that kind of time sewing boning channels.  Boring!  Instead, I chose to base my bodies on the style of that German example I mentioned earlier, worn by Pfalzgrafin Dorothea Sabina von Neuberg, dated to 1598.  It's featured in both Tudor Tailor and Patterns of Fashion, so I have both step by step instructions and detailed diagrams to work from.  It's also much more lightly boned- only to the underbust and at the center back, so that's a lot less work for me.  There's only one problem: the center front is designed for a separate busk, and the bodies lace up the back.  As someone who wants to get dressed on her own, this is an issue, so I adjusted the pattern for front lacing by omitting the busk.

I also decided there was no point in starting from scratch when I already have a perfectly good bodice pattern that's shaped pretty much the same way, so rather than trying to scale the pattern up from a book, I just used the bodice pattern for my Venetian gown, omitting the Venetian back point to allow for waist tabs.  This is the same pattern I used for my blue linen Venetian dress, but with an elongated front point.  The front gap on this bodice makes it ideal for a corset, since it allows for any give in the fabric.  Since I've made a dress from this pattern already, I know it fits and therefore didn't bother with a mock up.  I cut out two front pieces and one back in fashion fabric, lining, and canvas.

One of the front pieces
marked out for the bones.
Pins hold the layers
together while I work.
Remember how I said I had step-by-step instructions I could follow?  Well, I chose to mostly ignore them and make this piece the same way I usually make dress bodices.  The first step was to baste together the three layers of the back piece around the sides and bottom edge.  Then I started the boning chanels.  I started with the back piece, stitching six channels in the center back of the bodice.  The original had eight, but I'm petite, and six looked proportionate based on the diagram I was working from.  I didn't insert the bones yet, though, because the pieces will be a little easier to work with if I leave then out until all the pieces are sewn together.

I then went on to the front pieces.  I made the first chanel along the edge that will be the front center of the corset, and then handworked the lacing eyelets for one side.  This is much easier to do before adding the bones, as I discovered when I was making the waist eyelets at the end.  I really should have done that at this stage!  Then I made the rest of the boning channels, which only come to the underbust, creating "cups".  Then I repeated the process on the other front piece.

Making eyelets in four easy steps:

Step 1: poke a hole.  I use an
awl, but I read that some people
use a knitting needle or similar.

Step 2: 4 little whip stitches, one
on each side, to hold the hole
open while you work.
Step 3: whip stitch (or buttonhole if you
prefer) all the way around once,


Step 4: stitch all the way around
again.


Then I basted the pieces together and tried the bodies on.  They mostly fit, but I forgot I had been meaning to shorten the back a little.  The extra length isn't a problem in my gown, but it is with the bodies.  I was also having a weird problem with some gapping at the top of the back.  So I ripped out the basting on the side seams and cut a little material away at the bottom edge of the back piece and the sides where the side seams go, just under the arms.  I basted the whole thing together again, tried it on, and since the major issues were fixed, I then back stitched over the basting to give the side seams as much strength as possible.  I also covered the inside of the seams with the same ribbon I was going to bind the edges with at this stage.
Binding the inside seams.

Next, I added the bones to the front of the bodies.  I used synthetic whalebone because it's closer to the whalebone used in late 16th century examples than plastic boning, and I expect it to hold up better.  I then tried them on before boning the back, and I'm glad I did because I realized that the back of the garment didn't really need all six bones.  I decided to only add two to prevent the back from rolling up at the center.  I suspect the bones at the center back of the original were mostly there to keep the lacing straight, but since I adjusted for front lacing, this isn't an issue.  I'd still sew the channels or something to hold the layers of fabric together- and stiffen the back- next time, though.
Inside front, with bones.


Waist tabs, trimmed to size.
Once the bones were added, it was time to make the waist tabs.  I cut out 5 3.5x3 inch rectangles from the lining, interlining, and canvas.  The original pattern had 8 tabs, but I decided that scaling those down to my size would result in awkwardly small tabs, so I just made fewer of them.  I basted the three layers of fabric for each tab together, then rounded out the corners of the "bottom" of each one, and bound the edges.  I then attached them to the bodice by stitching them on with the right sides together.

Binding the edges of the tabs


Finally, I just had to bind the raw edges.  I did this using black grossgrain ribbon because I didn't feel like making bias tape.  I just whip stitched the ribbon first to the outside and then to the inside, taking care to keep things neat in to corners and curved edges.  The last step was to make 3 sets of eyelets at the waistline for pointing my petticoat to the corset.

All in all, I think it turned out well.  This is a utilitarian piece- it's underwear, after all!- and it does its job well.  It's pretty comfortable to wear, too, and there's enough extra room in the lacing for me to gain or lose a few pounds and still have it fit.  There are a couple of things I'd do differently next time, but they're mostly just things that would make the construction easier, like making all the eyelets before adding the bones.  The only one that's really for aesthetic purposes is that I'd add another full length bone on the other side of the lacing eyelets to prevent wrinkling, but that's not bad enough for me to redo anything.  I don't think there will be a next time unless this one wears out!

Finished inside

Finished outside

Thursday, June 4, 2020

I Made a Pocket!


Did you know that enormous pockets were the norm in the Renaissance?  Neither did I before I started doing serious research on 16th century clothing.  They started to appear in the late 14th century, and remained in fashion at least through the 18th, but went out when sheer dresses came into style around 1800.  Ladies' pockets tied on around the waist, rather than being sewn into the garment, and would look a little funny under a sheer gown!  I have no idea if they came back in under the more modest dresses of the Victorian period or not.  So if you've ever wondered, like I did, why medieval people usually have purses or pouches but Renaissance people usually don't, this is why!

So, naturally, I had to have pockets!  Or rather, pocket, singular, since one is more than enough space to hold everything I need with me at Renfaire!  I made one last year when I was just getting into historical sewing, and it works well, but the tie- which will show under my open bodiced Venetian dress- is red, so I'm making another using the same method.  The pocket and its tie are made of a midweight white linen that matches my camica well so it hopefully won't be too obvious.

I decided to embroider my pocket, mostly for fun and to practice my embroidery on something that won't actually show when I'm wearing it.  First I outlined the front piece of the pocket on the fabric, making sure I gave myself enough room to store the essentials- phone, lip balm, wallet, sunscreen, etc.  Then I drew a simple, Italian inspired but not quite historical spiral pattern on the pocket in blue tailor's pencil and put the whole piece of fabric in my embroidery hoop.  doing the embroidery before cutting helps prevent your pattern piece from fraying while you embroider it!  Since this piece isn't actually going to be seen while I'm wearing it, I didn't do anything too elaborate.  It's pretty much all stem stitch with a little satin stitch, all in 3 strands of wine red DMC floss.

Once the embroidery was done, I folded the fabric over and cut out the front and back pieces together, leaving a double seam allowance so I can do French seams.  I pinned the two pieces together, wrong sides together, stitched using half the wide seam allowance, trimmed the seam allowance, flipped them right sides together, and stitched again to create a French seam.  I usually prefer flat felled seams for garments, but the bulk of a French seam doesn't matter on a pocket.

I stitched up the bottom and both sides of the pocket with French seams and then made a tie by sewing together thin strips of linen to make a total length long enough to wrap around my waist and tie a bow.  I sewed this to the pocket, right sides together, then flipped it, tucked in the raw edges, and whip stitched the entire length.

This project was really quick and easy, apart from the embroidery, which took some time.  I really like how it turned out, though I realized after the fact that I accidentally made it a lot smaller than my other pocket.  It still has enough room for everything I need, though, so this doesn't matter much!  I also tried it on with my Venetian dress, and the tie blends in with my camica well enough that it's not really noticeable.  So that's one more small piece ready to go for this year's RenFaire!

Tuesday, May 26, 2020

Renfaire 2020 Progress Report


After finishing my ruff yesterday, I decided to try on my entire Venetian ensemble- hair and all- to see what I still need to do before the Colorado Renaissance Festival starts.  Sure, it's been delayed until August because of the pandemic, but what if I need to shop around for a while for something?  So I did my hair and put on my whole outfit, took some cute pictures, and wore it around my house for a while.  I concluded that I need a couple of things to complete the look:

  • Earrings.  The ones I wore for the pictures sort of work, but aren't really right for the 16th century.  
  • More rings.  I own a lot of rings, but most of them were purchased at highland games, and definitely don't look right for the Italian Renaissance!  I only have two that work, and would like more.  
  • A veil.  Italian ladies are usually depicted with their hair uncovered, but often have a fine silk veil pinned in to their elaborate hairstyles.
  • A mask.  We're all probably going to have to wear them this year, so I might as well do it properly and find something that looks "period."  More research required here.
  • An underskirt of some kind.  Maybe a corded petticoat or farthingale?  my skirt could use more volume!  Again, more research is required.
I also decided I need a couple of things that don't really show but would make my life easier:
  • Drawers.  I have no intention of wearing bike shorts under this dress, and drawers are the renaissance solution.
  • Garters.  I'm going to be too busy at faire to pull my socks up every few minutes!
  • A pocket.  I have one, but the tie is red, and would show under this dress, so I need to make one with a white tie!  Edit: my pocket is done!
And naturally, there were a couple of things about my outfit that weren't quite working as intended:
  • My sleeves are a little too tight at the tops, which is causing them to slide down and pull the dress straps with them.  This should be a pretty easy fix.
  • I should probably get a slipperier ribbon than the velvet one I used for my hair.  It works, but silk would be easier to use!
  • My camica sleeves are too long!  This is another easy fix.
All in all, though, I'm really happy with my progress on this outfit!  Things are coming together well, and I should have no trouble getting the things I need done before August!


Monday, May 25, 2020

Venetian Partlet/ Falling Ruff

My new Venetian partlet/ falling ruff!


The ruff is probably the most quintessential piece of late 16th century fashion, but as far as I can tell, the big round dinner plate ruffs you see in late Elizabethan England were never common in Venice, and in the 1560s and '70s, the "ruff" seems to be more of a ruffle attached to the partlet.  Since most of my wardrobe is mid-century Venetian, I decided to make one of these.

The Venetian "falling ruff" is pretty common in portraits from the second half of the 16th century, as are partlets with no ruffle.  Some of the partlets appear to be linen, and others appear to be sheer silk, though the ruff almost always appears to be linen and/or lace.  This leads to the interesting idea that perhaps some ruffs were detachable, and not an integral part of the partlet, but for the sake of simplicity, I decided to make mine one piece.  I may make another one in the other style at a later date, though, in a fancier fabric.

Francesco Montemezzano, 1565-75
This partlet/ruff appears to be linen, trimmed
in lace.  I think I got pretty close to this look!
For this partlet/ruff, I'm using the same sheer white linen I use for 16th century chemises.  I used it for a ruffle collar on an Elizabethan chemise once, and it worked well for that, so why not, right?  It's not going to be completely plain, though!  Many of the partlets and ruffs in portraits appear to be decorated, often with pearls, lace, or blackwork or metallic embroidery.  I'm not very good at embroidery and mostly see pearls on collarless partlets, so I'm using some lace to make this elegant enough to go with the silk gown I'm planning.


The internet, Tudor Tailor, and common sense tell me a partlet pattern looks something like this:


Two front pieces and one back piece, in this case with a rectangular collar and a ruffle.  The measurements on my diagram are mine.  Shoulder seam to neck, and top of shoulder to underbust for the front, Shoulder seam to shoulder seam for the back, and collar bone to collar bone around the back for the collar.  Venetian partlets in portraits usually appear to have a v-neck effect, so I made my pieces a little narrow at the top and wider at the bottom.  There should also be a small semicircle cut out of the middle of the back top to accommodate the neck.  I'm going to do that when I have the shoulders sewn up, though, because I'd rather eyeball it than do math.  I'm also opting to make ties for the bottom out of ribbon rather than sewing them, because this makes my life a lot easier.  Some people pin their partlets on, or just make them long enough that they stay in place, but I prefer ties at the sides, so that's what I'm doing.


Very long ruffle, stitched together and
hemmed.  See my tiny (less than 1/2
inch) seam?
First, I attached the front pieces to the back with flat felled seams at the shoulders.  This is my favorite method of finishing seams because it hides all the raw edges without the bulk of French seams, but if you prefer French seams, they're also common in period.  Next, I tried on the partlet and cut out the back neckline.

Then I moved on to the ruffle.  I cut out my ruffle in several pieces to conserve fabric, resulting in a total length of about 48 inches, 4 times the length of the collar.  Since it was in pieces, the first step was to sew the pieces together, again with flat felled seams.  I then hemmed one side and both ends, and then attached the lace.

Sewing on the lace!
This is how the ruffle looks pinned to
the neck band.  Time to stitch!
Next, gathering the ruffle into the neck band.  Using very small gathering stitches, I gathered the ruffle to the length of the neck band. Then I pinned and stitched the ruffle to one of the neck band pieces.  This was kind of a pain.  Normally, I would use a whip stitch and be sure to catch either side of each pleat, but I was worried about the raw edges of this delicate linen holding up and wanted a bigger seam allowance, so instead, I stab stitched the two together, still stitching on either side of each tiny pleat.  Kind of annoying, especially since the edges of the lace kept catching the thread, but it worked.
Whip stitching the ruffle to
the neck band.

Then I sewed the neck band to the partlet, leaving seam allowances free at either end.  In retrospect, I should have pinned both neck pieces to the ruffle at the same time, but I didn't think about that until the first one was sewn on already, so the next step was attaching the second neck band piece to the ruffle.  This time, I just pinned the pieces right sides together and whip stitched over the edges, which was a mistake- I missed some of the raw edges of the ruffle, and had to go back and redo sections.  This may not have been a problem if I had been more careful the first time, but then again, I couldn't see all the layers very well.

Finally, I just had to attach the second neck band piece to the partlet.  I did this by folding the raw edges under and using tiny whip stitches, making the stitches as invisible as possible.  I put this seam on the outside of the partlet rather than the inside like I normally would because the ruffle falls over this seam, so it's actually less visible than the inside of the neck band.  This is also the side of the ruffle with visible stitching attaching the lace and holding the pieces together.  The outside of the ruffle is the underside, so this won't show when it's being worn.

Using small stitches to attach
the neck band to the partlet.
Once all the pieces were sewn together, all the "tricky" parts of this project were done!  Now all I had to do was hem the partlet and add the underarm ties and trim on the neckline.  Nothing complicated here, so this all went pretty quickly.

That's it!  All done!  One step closer to a complete mid-16th-century Venetian ensemble!


One step closer to a complete ensemble!


Saturday, May 16, 2020

14th Century Martial Surcoat

He didn't feel like putting on his mail, but it fits
over the gambeson, which is the important part!


This project started as my brother's Halloween costume last year, but as usual, things got a little out of hand...

I made a very hastily constructed (raw edges everywhere!) surcoat in just a couple of days- I finished it the morning of- for my brother to wear over his armor on Halloween last year, but I wasn't satisfied with the finished product.  It looked ok, but a lot of things about it aren't great.  It's made in a cheap, lightweight linen/rayon blend that doesn't really drape well, I didn't have time to finish the interior seams, and the applique device on the front was extremely rushed, so it's not really done properly.  So since I apparently can't let imperfection go, I decided to make a better one.  

The cheaply and quickly made
Halloween costume
version.  You can't tell here,
but the dragon is starting to fray.
My brother had designed his arms hastily in order to have the costume in time for Halloween, but upon further consideration, completely changed the color scheme, so rather than the blue surcoat with the red and white dragon, we now have a red surcoat with a "gold"- which is apparently what we call yellow in heraldry- dragon.  I'm going to say right now that while I write this blog specifically to help others with historical costuming, please don't copy my brother's personal arms!  I'd love for people to follow this procedure to make their own clothes, but the arms are individual!  Design your own, and have fun with it!  Need help, or don't feel comfortable making your own garment or designing arms?  I take commissions, and I'm sure I can get my brother, who, unlike me, can draw and knows a lot about heraldry, to help with the designing bit.  Don't hesitate to reach out!
I did most of the construction of the actual garment back in December, and didn't take pictures, so I'll do my best to describe the process.  

I started out with the same pattern I used for Halloween.  I found it online at La Cotte Simple, which is a great resource for all your medieval garment needs!  She has two surcoat patterns, one with and one without side gores.  The one with gores is likely more historically accurate, since medieval fabrics were much narrower than modern ones, so I chose that one.  The other one is simpler, probably goes more quickly, and I'm sure it looks good over armor too, but I was going for accuracy here!  

I used about 2.5 yards of heavyweight linen for the surcoat itself, which is probably what they were made of in period.  For reference, the wearer is 6' tall.  How much fabric you need for the decoration obviously varies depending on what you're doing.  I found 2 remnants totaling about 1 yard of white linen, but was unable to find one of the yellow, so I just ordered a yard when the color I wanted was on sale.  I really only needed a little for the dragon, so now I have almost a yard of yellow linen left over for sleeves or something.  

I cut out the front and back panels and the triangular side gores.  Then I cut out the neck opening and a bit at the shoulders of the big panels.  I pinned in the gores and stitched the pieces together, then flat felled the seams.  This technique was used in period, and it's my favorite method of finishing seams because it encloses the raw edges completely without being bulky like French seams.  It's also really easy to do.  You just trim down one of the seam allowances, then fold the other over it, tucking the raw edges under, and stitch!

Flat felling a seam:


1. Sew the seam with a running stitch, then cut down one seam allowance
2. Fold the other side over and pin down
3. Stitch!

Then I cut the slits in the front and back panels and hemmed them, but didn't hem the bottom of the garment yet.  I wanted to try it on the wearer first to make sure my hem was even all the way around, but because I was planning to add a white piece around the shoulders, I hadn't done the shoulder seams yet.  I also realized after cutting out the red fabric that the shoulders were much too marrow, which is what I get for cutting things out when I'm tired.  So I decided to fix this by making the white piece wider, and wanted to finish the shoulders once I added that.  If you don't have any extra pieces to add here, this would be the time to hem the bottom too.

Before doing that, though, I decided to add the decorations.  This is the tricky part.  Embroidery is really not my strong suit!  So when my brother asked for the dragon to be embroidered on, the answer was absolutely not!  In seriousness, though, applique was a very common method of decorating clothing in the medieval period, so I think this is more likely the way it would have been done.  

The first thing I did was the white bit around the shoulders.  I cut out my pieces and pinned them to the surcoat, rolling the raw edges under.  I then whip stitched the white fabric in place using white perle cotton thread.  I decorated the tips of the zigzags by making my stitches right next to each other.  Nothing crazy- I'm embriodery challenged, and wanted to keep things simple!

We have a dragon!
So.  Many.  Pins.  Definitely
stabbed myself a lot doing this!


Then I cut out the dragon.  I can't draw, so my brother made me a printout of the device (the dragon and sword) to use as a pattern.  I left off the small parts like the horn and the tongue, since cutting those out with a seam allowance was going to be too difficult, and figured I'd add them back on in embroidery at a later stage.  I then pinned the dragon and the sword to the front of the surcoat, again making sure to turn under the raw edges, and stitched them in place with regular thread that matches them.  Next, I went back over that with backstitch in thin, black perle cotton, adding the fine lines of the design.


Maybe one day I'll actually
invest in a bigger embroidery
hoop... Adjusting constantly
is kind of annoying.
The lines on the dragon's belly and wings were added with just a single line of backstitch in thin perle cotton thread.  I added the horn, claw, and tongue at this stage by outlining them with backstitch and then going back and filling them in with satin stitch in the same thread.  I used an embroidery hoop for this step to stabilize my fabric, since I'm dealing with a lot of small detail and actually drawing with the thread here.  On simpler embroidery like I did over the edges of the white piece, I don't bother.  Ideally, the hoop is big enough to contain your whole design, but I only own one, so that's what I used.  I had to move the hoop around a lot, but I'm not really doing anything detailed enough for that to matter. 

Once this step was done, I got rid of the hoop and whip stitched over the edges with the same embroidery thread, keeping my stitches very close together.  This created a thick black line around the outside of the device.  I have no idea if this is a correct technique for medieval clothing, but it looks nice.  Once this was done, I moved on to the squiggly white line (apparently the technical term is either "fess" or "bar wavy", but I didn't know that either!) around the waist of the surcoat, which I attached the same way I had the zigzaggy piece at the top.  If I'd thought about it before I got halfway through this section, I would have used a much thinner perle cotton than I did to still get the decorative effect with less effort, but oh well.  I like how the thicker one looks anyway.
Finishing the neckline

Finally, I just had to finish the neckline, shoulder seams, and hem.  I did the neckline by turning the raw edges of the white and red fabrics towards each other and hem stitching them together.  I then did the shoulder seams the same way I did the other interior seams, by flat felling for both strength and finishing raw edges.  Finally, I rolled the raw edges of the bottom in and hemmed, using buttonhole stitch around the tops of the front and back slits.  And that's it!  I'm pleased with how this turned out, though I think I made the back slit a little too high.  It's even with the front one, but when it's worn, I think it looks long, so next time, I'll probably make it a couple of inches shorter.